Very Denniee Nails :): China Glaze
Showing posts with label China Glaze. Show all posts

Tuesday, April 23, 2013

155. China Glaze - Fancy Pants

Fancy Pants is a blue-toned purple with magenta shimmer running throughout.  In the bottle, I thought I would love this immensely.  However, it kind of disappointed me on the nail.  The shimmer is not as apparent on the nails as in the bottle.  I was hoping for a bit more of a wow factor, but ah well, this is how it goes.

More accurate to color.


Formula was nice on this polish.  It was almost opaque in one coat, but I used 2 coats for this swatch.

Tuesday, April 9, 2013

153. China Glaze - Mimosa's Before Mani's

Mimosa's Before Mani's was one of the polishes I was looking forward to most from CG's spring collection!    Usually I don't like pinks too much, but if it leans peach or coral, I gotta have it!  Mimosa's is a peachy pink/coral with golden shimmer. And we all know how I am about that golden shimmer :)  The golden shimmer isn't really that apparent (especially in the picture below), but it does give the polish a slight glow, making the color a little warmer.

This color leans a little too peach.  Imagine a touch of orange in this swatch.
In most lights, it leans more orange.  My boyfriend even thought I was just wearing an orange polish on my toes :P  I can see myself wearing this a lot this year on my toes.  I love bright colors on my toes!  Even if I can only wear open-toed shoes 1-2 times a week, my polish will be cute :)

This swatch shows 2 thick coats, but 3 thin ones would probably be better.  The formula wouldn't self level, but topcoat takes care of all that.

Thursday, April 4, 2013

149. China Glaze - Custom Kicks

Custom Kicks is one of my favorite polishes.  It's an aqua cream with sparse gold shimmer.  I saw aqua because the base color is a little too green to be teal.  Of course, I love the gold shimmer.  It gives the polish a little hidden sparkle to it.  In most lights, it's not really that apparent, but the polish gains just a little more life.  I think the shimmer makes it look as if sunlight is reflecting off the surface of a still lake.


Formula-wise, this polish was good.  It covers perfectly in 2 coats, with no balding or patchiness.  However, Custom Kicks stains like no one else's business.  I still have the stains from wearing it.

Wednesday, April 3, 2013

148. China Glaze - Midtown Magic

Midtown Magic is a polish I wore late last quarter.  Midtown Magic looks like a chocolate brown shimmer in the bottle, but it is so much more than that!  Well, I guess in these pictures, it does look just like a warm brown with gold shimmer.  And it's absolutely beautiful that way.  But during application, the first coat shows that this polish has a plummy purple undertone.  I kind of wish I took a picture of it at one coat.  Oh well, it's beautiful after it reaches opacity.  It kind of reminds me of fizzy coke :)


However, the formula leaves a little to be desired.  It's thin and watery, making it a little difficult to control.  Coverage on the first coat is very patchy, and drags on the second.  If you're really careful and have a light hand during application, 2 coats will work for opacity.  However, I had to use 3 due to some bald patches.

Sunday, March 3, 2013

Interlocking Dots

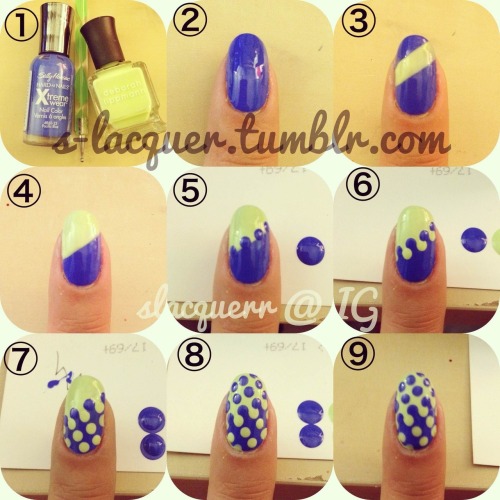
Hey guys!  Here's a quick post on my current nails :)  This is my first attempt at the interlocking dots, and I really love it!  The pattern just has so much visual interest.


To create this design, first I painted a base coat of teal.  Then, after the teal dried, I used tape to cover the bottom of my nail in a diagonal line and painted the top with the black.  Actually, you don't really need the tape, since you would be covering the line up with the dots.  Then, I dotted the teal onto the black and the black onto a teal.  Haha, this is kind of hard to explain without a graphic guide.

Here's the tutorial I followed to get this look (with a few alterations):

source: http://s-lacquer.tumblr.com

This mani was really simple to do!  It only took me 20 minutes to do all the dots!

Colors used:
Teal: China Glaze - Custom Kicks
Black: Color Club - Beyond

Tuesday, February 19, 2013

Unintentionally Aggie

I just thought these colors looked pretty together...but then a coworker of mine pointed out that they look like UC Davis colors >.<  This mani was from a few weeks ago.  The lovely thing about chevrons is that you can (kinda sorta) freehand the design.  Obviously, if you are a total perfectionist, you're going to want to break out the tape for those crisp lines.  However, this was pretty enough for me :)


See?  Don't the colors match up pretty well?  The blue is AA's Mount Royal, the gold is China Glaze Passion, and the white is the ever-trusty WNW White Cream.

Thursday, February 14, 2013

Sealed With a Kiss!

Happy Valentine's Day everyone!   I hope everyone had a good day, regardless of relationship status.  This day should remind everyone to appreciate love around them, not only in a significant other, but also in friends and family.  Today I have a special mani to show you guys.  Normally I'm not huge on pink and overly girl, resulting in this mani:


Obviously it's still a Vday mani, what with the heart and kiss mark.  However, it's a more subtle approach.  My inspiration for this design comes from the idea of someone pouring their heart into writing a love letter, finally sealing it with a kiss.  The brown is supposed to be something like a coffee stain or something, to show how much the letter was toiled over.  I guess it kind of looks like blood too...someone really put their soul into this letter...


Okay, that tangent took a surprisingly creepy turn.  The white base was China Glaze Snow, and to get the text on my nails, I simply soaked a piece of newspaper in rubbing alcohol and pressed it against my nail for a minute or so.  I figured out that the harder I pressed, the more text transferred!  Haha, imagine that ^_^;;;  After transferring the text, I painted on the lips, heart, and stains using a small striper brush.  The red is Essie Ole' Caliente, and the brown is Essie Mink Muffs.

I hope you guys enjoyed this post!  Until next time :)

Saturday, December 8, 2012

52WC: Week 10 - Winter

Today I have a nice wintery manicure for you guys!  After a Secret Santa gift-giving session on Thursday, some friends of mine came over and we all did nails and watched New Girl (love that show! Schmidt!).  I wanted to do something simple, and then I realized that I still hadn't done my challenge of the week.  Scrolling through my pinterest, all that I saw in sight were typical winter manis.  However, I wanted to do something different.   When I saw a penguin mani, I knew that I had to have penguins!  But I don't like doing freehand art on all my nails (mostly because I suck at it).  So I just decided to have the penguin in the snow :)

Do you like my ram/sheet/whatever you call this animal?  It's so cute!


To do the penguin, I painted a base of black, then painted a white on for the belly using a nail art brush.  I also did the beak with a thin nail art brush.  Using two differently sized dotting tools, I first dotted the white with a large one, and then the black on top with a smaller one.

For the snowfall, I was actually aiming for a dot gradient, but it doesn't look like it turned out too much like that.  However, it still looks pretty.  I painted a pastel blue base and then used a large dotting tool to dot the tips, and then a medium sized one down the middle portion of my nail, and a small one towards the cuticle.  Then I topped the whole thing off with China Glaze White Cap to give the snow a more welcoming warm glow.

Colors Used:
Wet N Wild - Black Creme
Wet N Wild - White Creme
Zoya - Arizona
NYX Advanced Salon - Pastel Blue
China Glaze - White Cap

Thursday, November 29, 2012

Catching Up on the 52 Week Challenge!

Hey guys!  Sorry I haven't posted in a while.  School and work have gotten really busy lately, and it's approaching finals soon.  I've still been polishing my nails and everything, just haven't really had the time to go through and edit pictures.  Only 2 more weeks until the quarter's over and then I can do some soul-feeding with nail polish, Assassin's Creed, random DIY crafts, and some self-pampering.  And I need to clean the house...but that's another story.

Anyways!  Onto the nails :)  Previously, I was behind on the 52 Week Challenge, but now I am finally up to date :)  Since I haven't posted in a while, I just decided to let everyone see what I've done over the last couple weeks all at once.  So enjoy!


Week 9: Rainbow
Week 7: Black and White


Week 8: Saran Wrap
More details after the jump!

Saturday, November 10, 2012

110. China Glaze - Liquid Leather

Liquid Leather is one of my favorite black bases to use in nail art.  Not much to say here, it's your basic black.  It makes a good base for sparkle/duochrome topcoats :)


Slightly watery formula, with a little cuticle flooding.  2 coats shown here.

Sunday, October 28, 2012

52WC: Week 4 - Gradient

Okay, so I cheated.  I skipped week 3 because it was Reddit-inspired nails, but I had no inspiration.  I've only been a member of Reddit for maybe a month, so I had no idea what defines Reddit, and what I should do for my nails.

So for week 4, I decided to do a little different of a gradient.  For those of you guys who have been reading my old posts, you know that I'm quite fond of gradient manis.  Not only do they look cool, but they're easy and fast to do!  For this gradient, I was inspired by some rainbow gradient mani I saw a picture of on tumblr once (however, I could not find the picture I saw, so I can't show you).


I'm not quite pleased with how the gradient turned out.  It's not blended enough for my liking, and the colors are a bit too bold for the look I was trying to achieve.  Maybe I'll try it again when I have more time.


Colors Used: 
Wet N Wild White Cream (a white base for the gradient's colors to really pop)
Essie Ole Caliente
Zoya Arizona
Zoya Pippa
OPI Don't Mess with OPI
China Glaze Bermuda Breakaway
China Glaze Grape Pop

Wednesday, October 24, 2012

104. China Glaze - Bermuda Breakaway

Oh goodness, I believe that I am out of old swatches to show you guys.  Hopefully I can do some more manis soon...it's midterms week, and I'm so behind on studying!  Oh well, only a couple more days.

Anyways, Bermuda Breakaway is a lovely, rich cobalt cream.  It looks quite elegant on the fingernails, and it's a perfect color for fall.


Formula was quite nice; easy to control with little to no dragging.  It dries quite glossy as well.  This is two coats, no topcoat.

Saturday, October 20, 2012

100. China Glaze - Bahamian Escape

100th Swatch!! Woohoo!  (only two-hundred odd polishes to go...) Bahamian Escape (featured as the base of yesterday's post) is a perfectly sky-blue cream, similar to OPI's What's With the Cattitude but brighter and with less white.


This color covers perfectly in two coats.  Formula was good, not too runny or thick.

Wednesday, October 10, 2012

95. China Glaze - I'm Not Lion

Hey guys!  If anyone's noticed, it's been a while since my last post, and I'm really sorry about that.  I've completed moving, but unpacking is another story.  Everything in the house is just a mess...

Today I'm wearing I'm Not Lion from China Glaze's fall collection.  I'm Not Lion is a lovely white-gold glitter with holographic glitter scatter throughout the polish.  This polish is definitely a little bit less in-your-face, due to the subtle color, but I really like it.  It's like jewelry on your nails (white gold is actually my favorite metal for jewelry)!

This swatch is shown with 2 coats, just enough for opacity.  The color of this polish is quite similar to my skintone, you can't really see VNL so I'm not really bothered enough to add another coat.  The formula was quite nice, not too thick or thin, and it dries really fast!  On top of the glitter, I applied 3 coats of Poshe topcoat.  This glitter dries quite gritty, but the topcoat really helps bring out the shine.


Pastel Spun Sugar

I've been seeing this mani around a lot lately, and decided to try it out for myself!  I really like how this turned out appearance-wise, but I'm not digging the bumpy feeling on my nails.  The flashes of color keep the black nail polish from looking too goth.

To do this, first paint a base layer of black.  Hassid is my go-to black since it's a one-coater and it's so easy to work with.  After that, I put a few drops of polish down onto a clean piece of plastic.  Stir the polish (using a toothpick or dotting tool) to make it dry faster.  After it has dried a bit, start dabbing at the polish with your dotting tool, pulling up.  When the polish starts getting stringy, drag the string of polish across your nail in horizontal lines.  Do this with each nail until you're done!


I wouldn't recommend topcoat with this mani.  I tried using topcoat with the first nail I did, and the whole nails smeared miserably.  So sad.  So leave the mani un-top-coated.  Wear time suffers a bit because of this, but it's unavoidable.

I do like how this mani looks, but it's extremely messy and time-consuming.  I took 2-3 hours to finish all my nails!  Not to mention that the stringy polish chips off when you do regular things (like wash dishes, etc).  I guess I'll save this one for a special occasion.

Colors Used:
AA Hassid
Zoya Shelby
China Glaze Bahamian Escape
Essie Navigate Her
China Glaze Lemon Fizz
AA L'Espirit

Sunday, October 7, 2012

93. China Glaze - Flirty Tankini

Whew!  I've waited a long time for this polish.  I can honestly say that this is my first neon polish.  Flirty Tankini looked like it was just a plain pink-coral cream, but in reality it has this nice, fine shimmer running throughout it.  Like most neons, this polish dries matte, which I don't really like in a shimmer, but it can be appealing in some circumstances.  Honestly, I can say that I'm a little disappointed by this polish.  I was expecting more of a coral color, but on my skin it looks more like a barbie pink.  Maybe Pink Plumeria would be a better fit...Also, the smell of this polish is really bad, rivaling that of KleanColor's.


This swatch is 2 coats, although it could probably have used a third.  Formula was a bit watery, and I could see that the polish's shimmer tends to settle; so I guess it could still be a cream if you wanted it to be.

PS:  I wonder if you guys noticed I changed my lightbox set up.  The background is now black, which I find makes my pictures a little more color-accurate.  That, and this looks pretty class, don't you think?

Friday, August 24, 2012

30DC: Day 11 - Polka Dots

Hey guys!  Just to let you know, I'm still in the process of moving, so I haven't really been able to post anything.  I've still been doing my nails though, so hopefully I can get more posts to you soon!  Today I just have a quick mani I did over the weekend.


To create this look, first I painted a white base.  Then I dotted the light grey in varying sizes, with bitter dots at the tip, and smaller dots toward the base of my nail.  After that, I repeated the same process with the medium grey and finally with the black.


I've had this idea in my mind for a while, so I was glad to get it out of my system.  I really like how it looks; it kind of reminds me of bokeh in photography.  If you don't know what that is, here's an example!


Colors Used:
White: China Glaze - Snow
Light grey: Zoya - Kristen
Medium grey: Zoya - Kelly
Black: China Glaze - Liquid Leather
Topped with Poshe topcoat

Wednesday, August 22, 2012

30DC: Day 10 - Gradient

Since I've done so many regular gradient designs during this challenge, I decided to do something different.  However, my first attempt did not turn out quite like I wanted.  The gradient wasn't very smooth and looks messy.  What I tried to do is similar to a border mani, but instead of clean-cut lines, a gradient goes around the edges.  I'll probably be trying this in the future again.


Colors Used:
China Glaze - Bermuda Breakaway
American Apparel - Gold Flash

Friday, August 10, 2012

30DC: Day 9 - Rainbow

Hey everyone!  Today's challenge is rainbow nails!  They look cool, don't they?  They remind me of beams of light, kind of like those diagrams they show in physics textbooks where a prism defracts white light into the individual colors.  To read about how I created this look, look after the jump!

Thursday, August 9, 2012

30DC: Day 8 - Metallic

Hey everyone!  So for this day of the challenge, I decided to do a metallic gradient.  I love doing gradients, they're pretty, so easy to do, and often are faster than doing a regular manicure where you just paint the color on.  I did green and gold because I thought it'd be a nice combination (kind of like money, you know), but in retrospect, I'm thinking I would have liked silver more.


Colors Used:
China Glaze - Passion
Color Club - Perfect Mol-ten