Very Denniee Nails :): striping tape
Showing posts with label striping tape. Show all posts

Wednesday, March 6, 2013

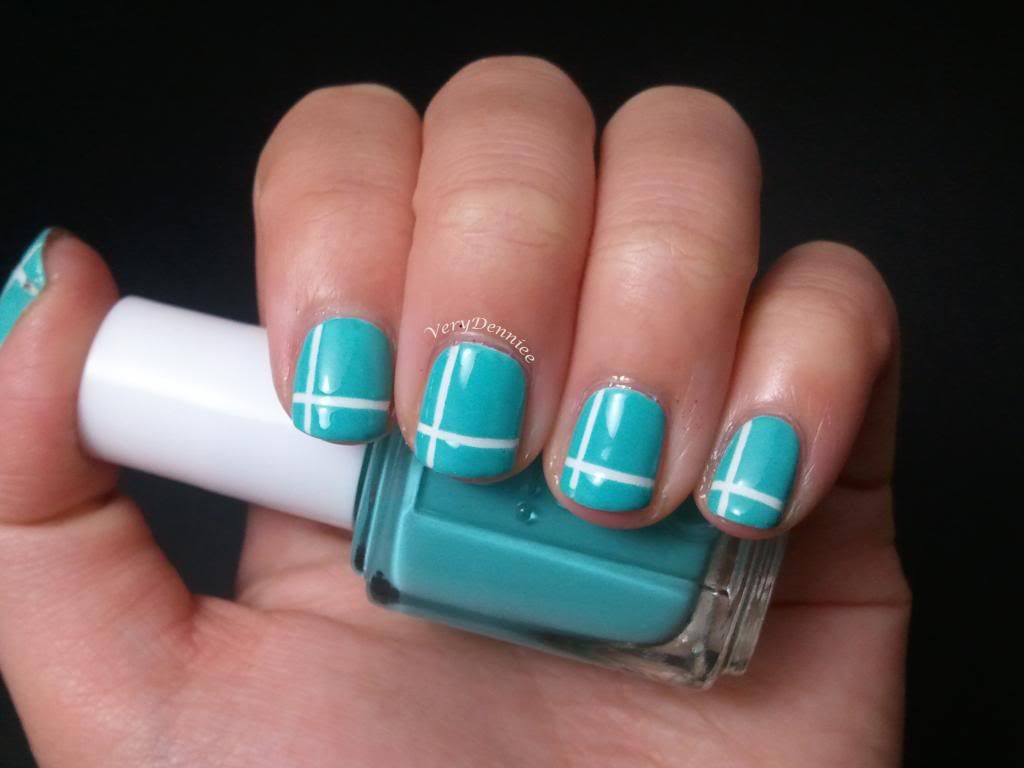
All Wrapped Up

Hello lovelies!  Today I have some more nail art from the vault.  This look was inspired by the Tiffany's boxes that you get with the jewelry.  I imagined a box with a ribbon to wrap it up nicely :)


This look was fairly simple.  I just painted a base of white and let it dry.  After the white completely dried, I placed striping tape where the white lines are.  Then I painted over the nail with the teal, removing the tape right after painting each nail.

I thought this look was quite simple, but classy, and I really enjoyed having it on my nails :)

Polishes Used:
WNW - White Creme
Essie - Where's My Chauffeur

Sunday, November 18, 2012

Pardon My French!

Today I just have a french manicure for you guys, but it's a little more interesting because of the colors used.  I feel like this would be a good mani to wear with a LBD :)  The base color is Rehka, a rich red that is actually darker in real life than in this picture.  The tips are AA's Hassid.  I actually tried to freehand the tips, but they didn't look that nice, so I covered the lines with white striping tape in order to make it a little cleaner looking.  Funny how the striping tape is actually a bit transparent.


Friday, August 10, 2012

30DC: Day 9 - Rainbow

Hey everyone!  Today's challenge is rainbow nails!  They look cool, don't they?  They remind me of beams of light, kind of like those diagrams they show in physics textbooks where a prism defracts white light into the individual colors.  To read about how I created this look, look after the jump!

Saturday, July 28, 2012

30DC: Day 5 - Blue

Today I tried something I've wanted to do for a long time: a gradient over striping tape!  It didn't quite turn out how I wanted to (I wanted a much smoother gradient), but it still looked nice nonetheless.  This mani kind of reminds me of fading denim.  I also think I chose a color that was too opaque for gradients.

Colors Used:
China Glaze Snow
American Apparel Passport Blue

Wednesday, July 25, 2012

30DC: Day 4 - Green

I couldn't really decide on a single design for all my nails, so I went with a bunch of tape designs!  Hope you like them (I know I did :)  This was a really fun day to do!

Colors used:
WNW Black Creme
Zoya Ivanka
OPI Jade is the New Black

Wednesday, June 13, 2012

Teal Tips

It's amazing what you can do with a bit of tape!  Blargh, all the clean lines got smudged by the topcoat.  Since my Poshe and Seche Vite are both gloopy and useless, I used a random Color Club clear coat I found laying around...


This look:
1 coat China Glaze Icicle (base)
1 coat SH Insta-Dry Teal-y Fast (tips)

Monday, June 4, 2012

First Attempt with Striping Tape!

This mani was pretty simple, but it looks so clean!  Love it!

Colors Used: 
Tips - Zoya Kelly
Base - Zoya Uli
What I did:
Paint 2 coats of the base color
Tape off the bottom half of my nails
Paint 2 coats of the darker color over my tips
Apply striping tape

When you do this kind of manicure, make sure you let your nails really DRY.  I always have a problem with this kind of mani... I kept pulling off chunks of nail polish each time I applied tape. T-T

Thursday, May 31, 2012

Tropical Triangles

Hi everyone!  Here's some nail art for you!  I've been really busy, and I know it's almost been a week since I've last posted, but life waits for no one (I've been really busy).  Don't worry, I have lots of posts queued up for you guys :)  (Lots of fun nail art, nail projects, and swatches for everyone!)

Today's mani was inspired by Sophie at MyAwesomeBeauty.  You should go check her out, she's got some beautiful stuff there!


Excuse the dents!  Happened to hit the tips against a wall while I was getting a lamp into place.

How I did this mani was:
1. Paint the base color
2. Place striping tape in a diagonal manner (I placed it where you can see the gold peeking through)
3. Paint the bottom color (blue), trying to be careful to stay inside the bottom part
4. Paint the middle (green), again, careful to stay inside that part
5. Paint the top region (dusty lighter blue).
6. Remove tape

The reason I painted in this order was so I could possibly cover up any bits I painted out of place with the next color (it's easier to go from bottom to top).  Not the most sophisticated manner, but it works!  There are a few spots where the polish isn't quite opaque, but what can I do?  I didn't want to do multiple coats on top.  

And now here's a rarity: a shot of my right hand!  Same color scheme, but my right hand nails are little nubbins right now.  I keep almost breaking them, so I just decided to cut them.  And the previous design probably wouldn't work with such little nail space, so I decided to do something different, but still similar.  So here's a simple tape mani, using the same colors as the left hand.  I'm not used to taking pics of the opposite hand, so excuse the sub-par posing :3


I rather like this color combination, don't you?  It's a little bit brighter than Sophie's original manicure, but I think it's fitting for the season :)  The colors remind me of tropical seas and the beach (meanwhile, I've still got 2 more weeks of school...).

Colors Used:
Gold: American Apparel Gold Flash
Turquoise: Zoya Wednesday
Teal: China Glaze Shower Together
Green: OPI Green-wich Village

Stay tuned for more posts coming soon!